Why look go outside and check the temperature if you can automate it and use Python?
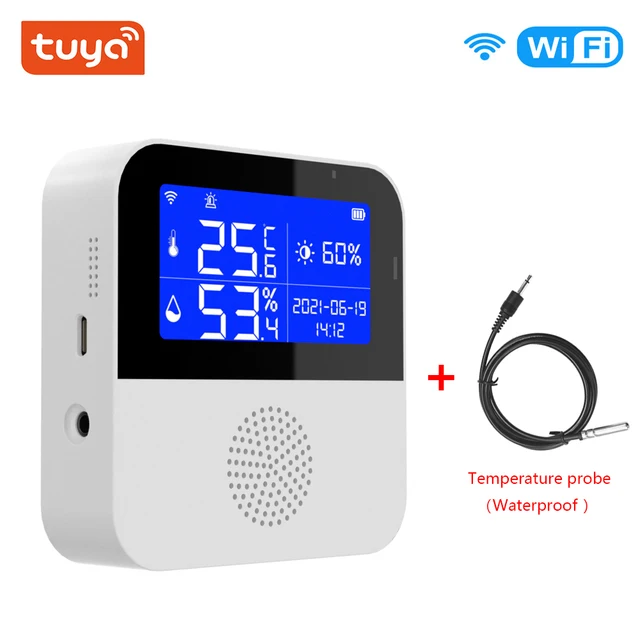
I purchased this inexpensive wifi-enabled temperature monitor from Aliexpress for approx $20 CAD. The goal was to log the temperature and humidty throughout the seasons and make a graph at the end of the year.
During the setup of the device, you have to use their cloud smart home app. You can only guess what they do with your data (hey, maybe they’ll see how cold it gets here in winter and feel bad for me). You’ll have to use the app to connect the developer account to your device.
tinytuya is a Python model for interacting with Tuya smart home devices
Install
python -m pip install tinytuyaScan for devices
python -m tinytuya scanDeveloper Account
First things first: create a developer account. Next you’ll have to create a cloud project, link your device and get your secrets.
Here’s the steps, copied from: https://pypi.org/project/tinytuya/
- TUYA ACCOUNT - Set up a Tuya Account (see PDF Instructions):
- Create a Tuya Developer account on iot.tuya.com and log in. NOTE: Tuya makes changes to their portal and this process frequently so details may vary. Please create an issue or pull request with screenshots if we need to update these instructions.
- Click on "Cloud" icon -> "Create Cloud Project"
- Remember the "Data Center" you select. This will be used by TinyTuya Wizard (screenshot).
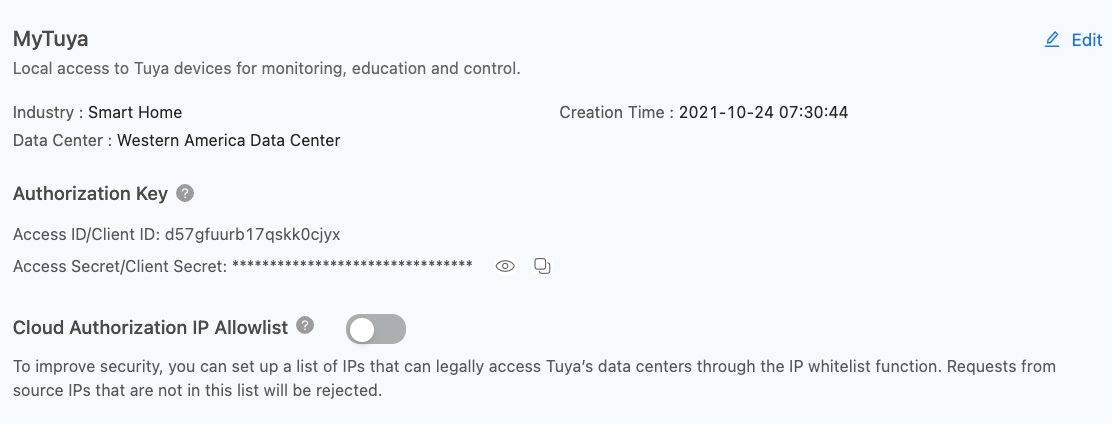
- Skip the configuration wizard but remember the Authorization Key: API ID and Secret for below (screenshot).
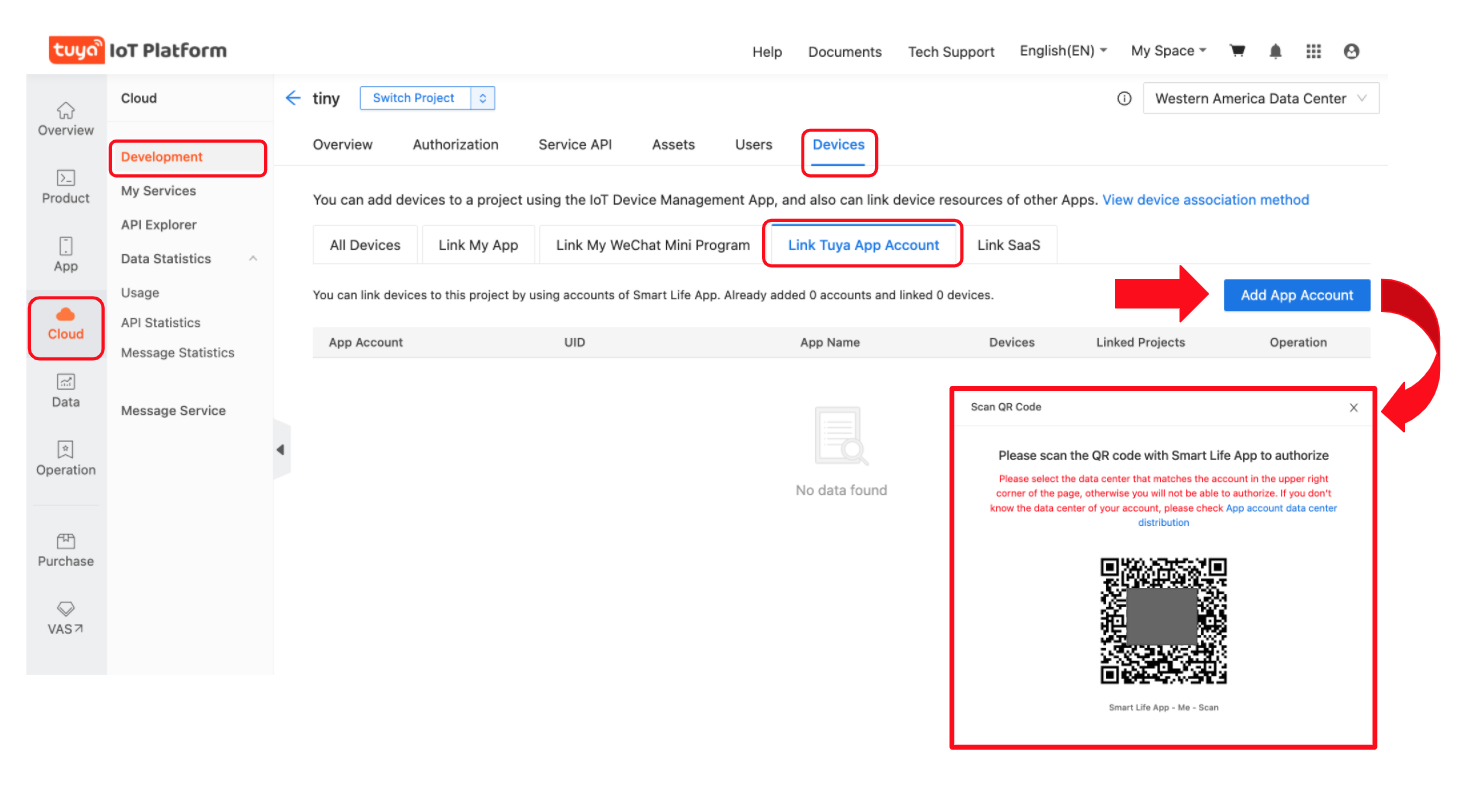
- Click on "Cloud" icon -> Select your project -> Devices -> Link Tuya App Account (see screenshot)
- Click Add App Account (screenshot) and it will display a QR code. Scan the QR code with the Smart Life app on your Phone (see step 1 above) by going to the "Me" tab in the Smart Life app and clicking on the QR code button
[..]in the upper right hand corner of the app. When you scan the QR code, it will link all of the devices registered in your Smart Life app into your Tuya IoT project.
- NO DEVICES? If no devices show up after scanning the QR code, you will need to select a different data center and edit your project (or create a new one) until you see your paired devices from the Smart Life App show up. (screenshot). The data center may not be the most logical. As an example, some in the UK have reported needing to select "Central Europe" instead of "Western Europe".
- SERVICE API: Under "Service API" ensure these APIs are listed:
IoT Core,AuthorizationandSmart Home Scene Linkage(NOTE: I didn’t need to add this). To be sure, click subscribe again on every service. Very important: disable popup blockers otherwise subscribing won't work without providing any indication of a failure. Make sure you authorize your Project to use those APIs:
- Click "Service API" tab
- Click "Go to Authorize" button
- Select the API Groups from the dropdown and click
Subscribe(screenshot)
- WIZARD - Run Setup Wizard:
- Tuya has changed their data center regions. Make sure you are using the latest version of TinyTuya (v1.2.10 or newer).
- From your Linux/Mac/Win PC run the TinyTuya Setup Wizard to fetch the Local_Keys for all of your registered devices:
python -m tinytuya wizard # use -nocolor for non-ANSI-color terminals e.g. Windows cmd
- The Wizard will prompt you for the API ID key, API Secret, API Region (cn, us, us-e, eu, eu-w, or in) from your Tuya IoT project as set in Step 3 above.
- To find those again, go to iot.tuya.com, choose your project and click
Overview
- API Key: Access ID/Client ID
- API Secret: Access Secret/Client Secret
- To find those again, go to iot.tuya.com, choose your project and click
- It will also ask for a sample Device ID. Use one from step 2 above or found in the Device List on your Tuya IoT project.
- The Wizard will poll the Tuya IoT Cloud Platform and print a JSON list of all your registered devices with the "name", "id" and "key" of your registered device(s). The "key"s in this list are the Devices' Local_Key you will use to access your device.
- In addition to displaying the list of devices, Wizard will create a local file
devices.jsonthat TinyTuya will use to provide additional details for scan results fromtinytuya.deviceScan()or when runningpython -m tinytuya scan. The wizard also creates a local filetuya-raw.jsonthat contains the entire payload from Tuya Cloud.
- The Wizard will ask if you want to poll all the devices. If you do, it will display the status of all devices on record and create a
snapshot.jsonfile with these results.
Once we have our local key, it’s time to get out data points.
Get DPS
Let’s use tinytuya to query our temperature monitor.
DPS explained:
The Tuya devices send back data points (DPS) also called device function points, in a json string. The DPS attributes define the state of the device. Each key in the DPS dictionary refers to key value pair, the key is the DP ID and its value is the dpValue. You can refer to the Tuya developer platform
for definition of function points for the products.
import tinytuya


d = tinytuya.OutletDevice(
       dev_id='a21a4b4ad3',
       address='192.168.1.137',
       local_key='deadb33f',
       version=3.4)


print(d.detect_available_dps())
Result:
{'1': 40, '2': 262, '4': 100, '9': 'c', '10': 1500, '11': -190, '12': 832, '13': 0, '14': 'cancel', '15': 'cancel', '16': 0, '17': 30, '18': 31, '21': True, '23': 0, '24': 0}What you’ll get back is a nice JSON string of all the available data points. I wasn’t able to find any information on this temperature monitor so here’s what I mapped out
Github
Code: https://github.com/snacsnoc/py-tuya-temp
DPS lookup table for Tuya Temperature Monitor
Note: For all temperatures, pad a decimal from the right. 452=45.2
| DPS | Value | Description | Unit | Info |
|---|---|---|---|---|
| 1 | 60 | Temperature | integer | |
| 2 | 452 | Humidity (%) | integer | |
| 4 | 100 | Battery | integer | 3.7V/500mAh, Built-in battery usage time: ≤4 hours (fully charged) |
| 9 | c | Temperature unit | c/f | |
| 10 | 1500 | Alarm Temperature upper limit | integer | Temperature alarm setting |
| 11 | -190 | Alarm Temperature lower limit | integer | Temperature alarm setting |
| 12 | 1000 | Humidity upper limit | integer | Humidity alarm setting |
| 13 | 244 | Humidity lower limit (24.4%) | integer | Humidity alarm setting |
| 14 | cancel | Temperature Alarm | on/cancel | |
| 15 | cancel | Humidity Alarm | on/cancel | |
| 16 | 0 | Light intensity | integer | Lux |
| 17 | 30 | Temperature report | integer | Alarm duration in seconds |
| 18 | 30 | Humidity report | integer | Alarm duration in seconds |
| 21 | true | Battery Switch | true/false | Enable battery backup |
| 23 | 0 | Temperature calibration | C +/- | Manually set positive or negative offset |
| 24 | 0 | Humidity Calibration | C +/- | Manually set positive or negative offset |